Deleting the datastore where a content library is hosted is probably not the best idea but … yes stupid error and now what. If you are not faint of heart (and now how to take a snapshot), you can rectify this. You should contact GSS as there is not documented solution and this might break.
Take a snapshot and verify if the vCenter backups are in a healthy status. Yes? Ok go ahead.
Log on to the vCenter and create a new Content Library and name it ‘i-made-an-error’. Use the new datastore you want to use and keep the rest of the settings default as these don’t really matter.
Open an SSH session to the vCenter and connect to the Postgress DB ‘VCDB’
Connect to the vCenter database
PgSQL
1
psql-dVCDB-Upostgres
To show which tables are present within the database:
Show all tables in the database
PgSQL
1
\d
Show an overview of the Content Libraries added ( make sure to add the trailing ;):
Show all the Content Libraries
PgSQL
1
SELECTid,nameFROMcl_library;
Now that we have an overview of the Content Libraries, with the one that is throwing an error highlighted.
In the following overview we find the library id from the new Content Library we just added and also the corresponding storage id.
Show all the Content Libraries and their storage
PgSQL
1
SELECT*FROMcl_library_storage;
I will update the storage id from the faulty one we found on the previous screenshot with the one we found for the new Content Library.
Update the storage id from the faulty Content Library
Today I deployed a new VCSA 7 U1 and as U2 has GA’d recently I wanted to update the environment first. So I headed to the VAMI interface > Available Updates page. Immediately there was an error:
I found some blogs that showed to delete upgrade status file ‘software_update_state.conf’ at /etc/applmgmt/appliance. While I tested with renaming this file to .old this did not resolve the error.
The file was recreated but held the same info, which is in JSON format and has an the following content:
Shell
1
2
3
{
"state":"UP_TO_DATE"
}
“UP_TO_DATE”, it clearly is not. So I found this KB article. This is also where I got the solution for my install. I compared the url I found in the KB article with the one that is included by default in the update settings page.
In my case when I alleviated the .latest from that url, updates are detected and I can proceed.
So as you can see in the screenshot below (well not entirely but you will need to take my word for it), I selected ‘Specified’ and supplied the following url:
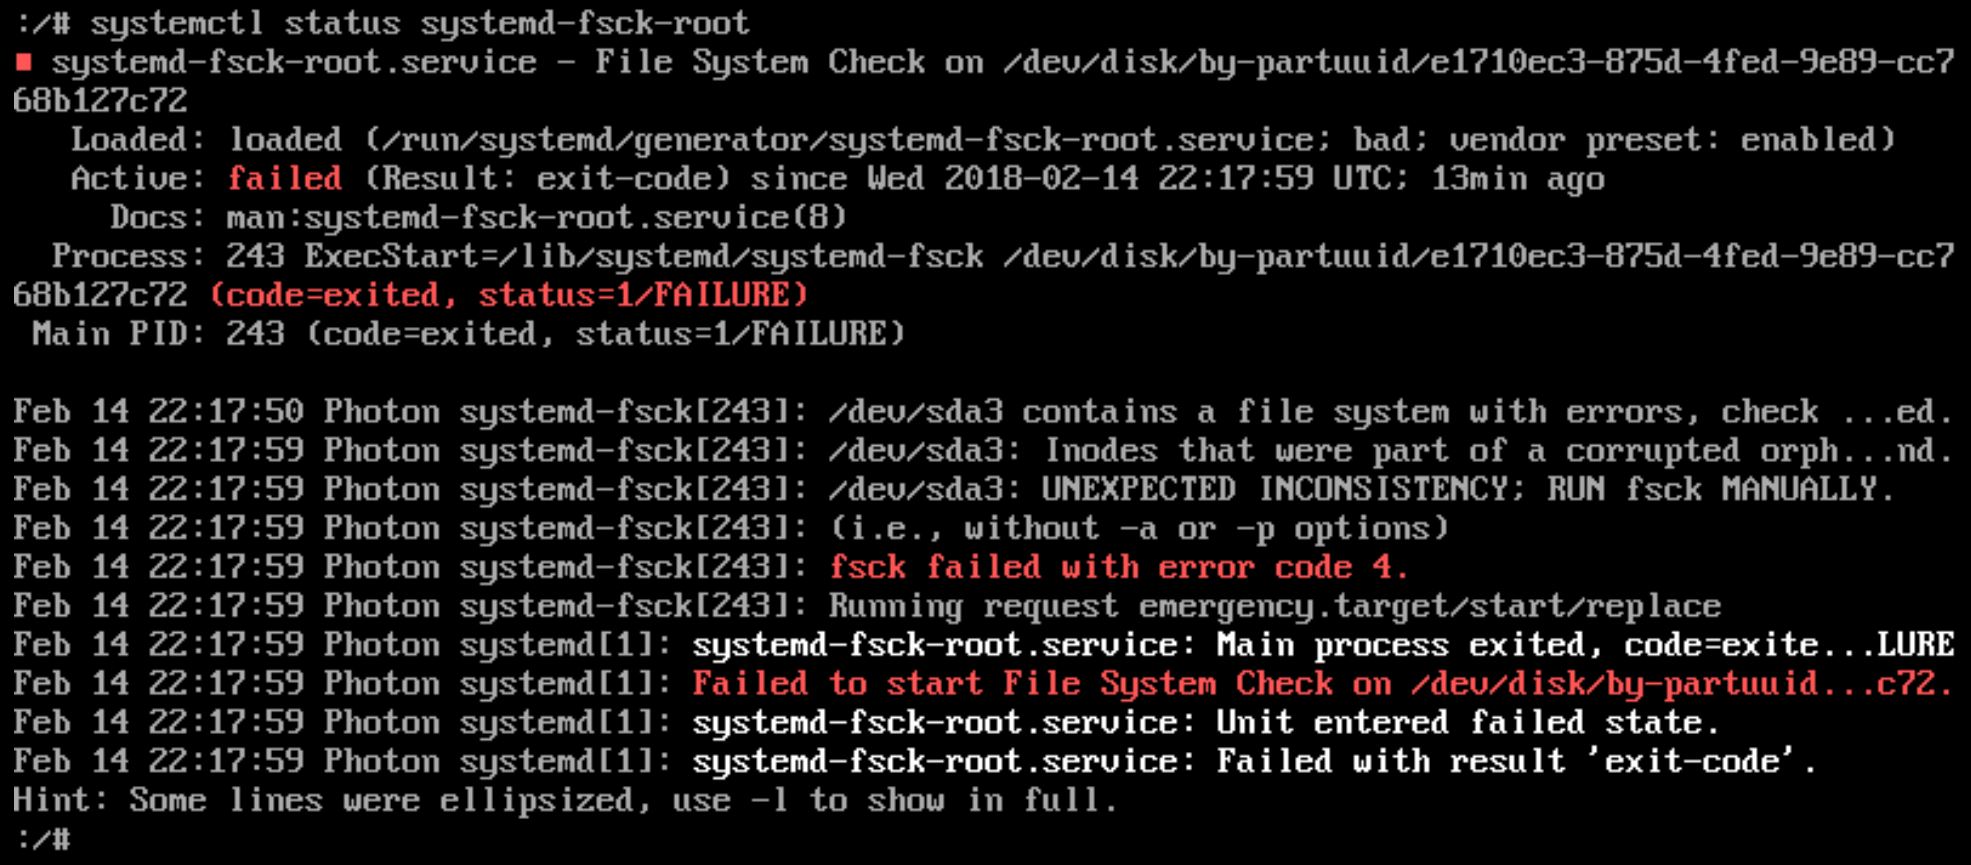
I had downtime in my lab due to an power failure which resulted in a boot failure of my VCSA 6.5 appliance. Looking on the console showed me a “[FAILED] Failed to start File System Check on /dev/dis…uuid/uuid. See ‘systemctl status system-fsck-root.service’ for details.” message. Therefor it booted into ‘Emergency Shell’ or ‘Emergency mode’.
I ran the command ‘systemctl status systemd-fsck-root’ manually. This showed me that the ‘/dev/sda3’ partition was having issues.
UPDATE: It also states “RUN fsck MANUALLY”. I did not notice this the first time
I tried to run fsck with no options to see if the command was known to the CLI. I then ran the command with the partition as a parameter ‘fsck /dev/sda3’. I answered ‘y(es)’ to all ‘Fix<y>?’ questions.
In the end I received the message ‘FILE SYSTEM WAS MODIFIED’ and tried to reboot. The reboot command gave me an error so I went through the ESXi to reset the virtual machine. Afterwards I was able to login again.
When connecting to your vCenter server via PowerCLI, one can use the -menu option. This will give a list of entries you recently used. You can manage the entries here:


