Cleaning up a (expired) Tanzu license is not possible from the GUI. It’s aesthetic, I know, but I want it out!
I enabled Workload Management on my cluster before, and assigned a license. Now the supervisor cluster is not there anymore, but the license assignment is.
If you experience this in a production environment :
Contact Broadcom support for assistance !
I wouldn’t write this blog post if it were merely a copy and paste from a Knowledge Base article. Anyway, the Broadcom KB article mentions two options :
use JXplorer – I didn’t want to go download and just work through the solution via CLI
CLI
We are going to focus on how to do this from the CLI !
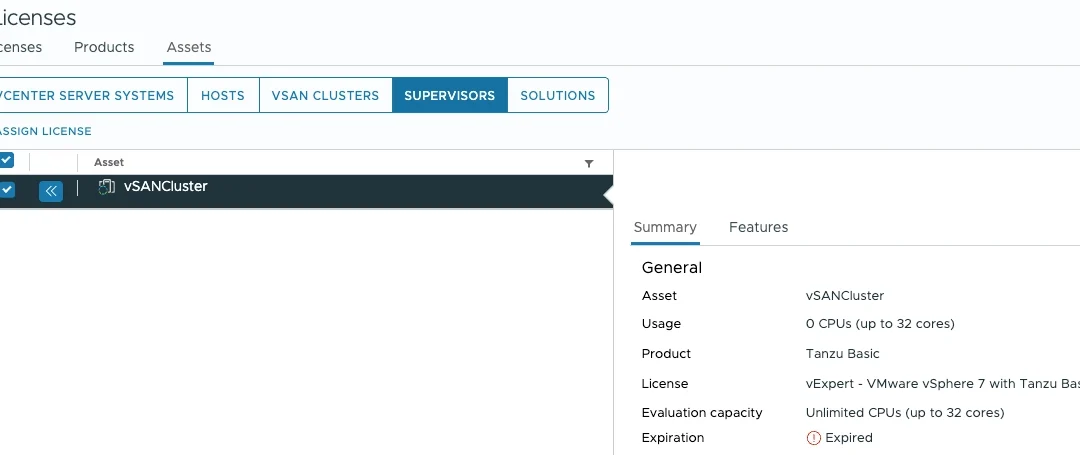
Let’s visualize how the problem looks, this is my view from vCenter:
Tanzu license assigned to the Supervisor cluster
It is standard behaviour that licenses assigned to an Asset, are not available for removal. Because it is Expired, it is just ugly showing there within the overview of my added licenses. I want to get rid of it, but how do I do that?
As mentioned in the Broadcom KB article, one can browse the LDAP database, and throw it out.
Backup (or snapshot) your vCenter machine, for real !
It will save your day (One day)
First, we need to find the entry for the asset, and license in the LDAP database. Piping it to ‘less’ will give the option to search (type /) through the content. You’ll need it as it returns a lot of values
/opt/likewise/bin/ldapsearch -h localhost -D "cn=Administrator,cn=Users,dc=vsphere,dc=local" -w 'INSERT_PASSWORD' -b "cn=LicenseService,cn=Services,dc=vsphere,dc=local"| less
ShellSession
In my case, I need to search for the supervisor cluster assignment. So I used words like Asset, Tanzu and wcp. It could be vSAN, or something else as well. I found two relevant entries, one for the license, and one for the asset assigned license. You’ll need the common name (cn) for the asset entity, in my case ‘AssetEntity_wcp-domain-c7-a76334a1-f4fd-4636-a466-e4c753d990ee’
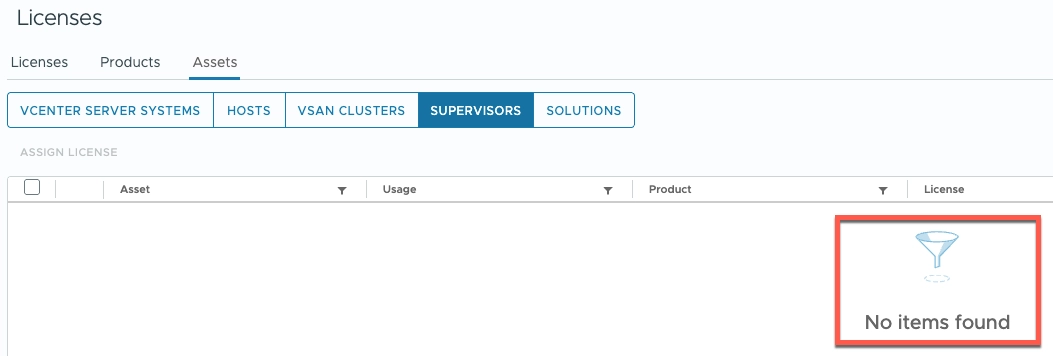
Revisit the Assets view. We see that the license is not assigned to the supervisor cluster anymore.
Cleaning the Tanzu license assigned to the Supervisor cluster
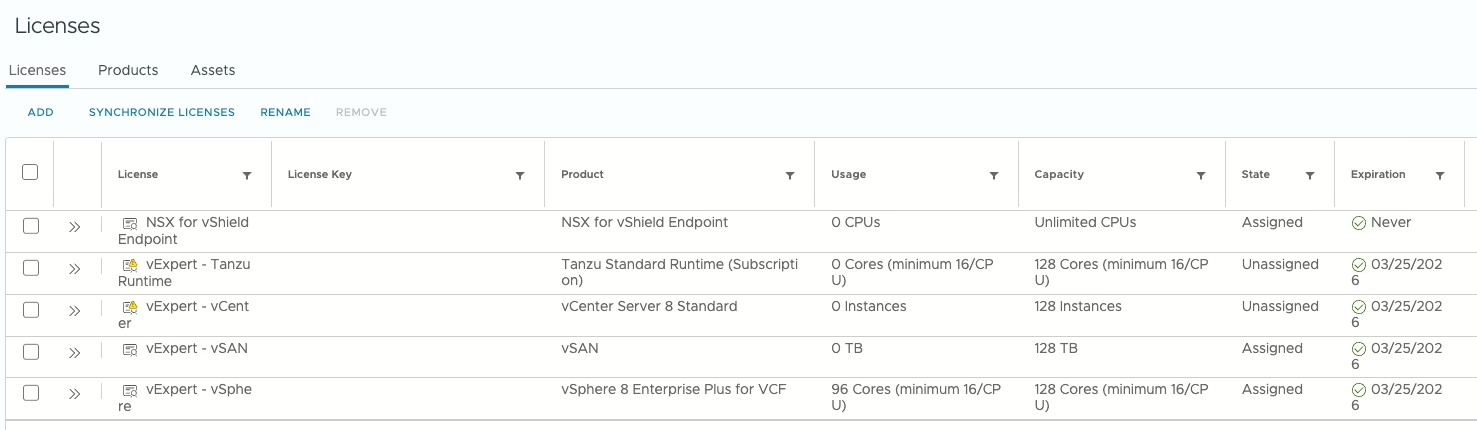
When we go and review the Licenses view, we can see that the license is still present, and assigned. I didn’t restart the vCenter vpxd service at this point. If I would have, the license would have probably been available for removal. I went on and removed the license via the CLI. Same as before, find the actual license in the LDAP database, and delete it. I searched for the first part of the license key, and copied the license entity, here ‘LicenseEntity_b056d2ce-b035-42f4-8733-b5d21c094121’
While going through the latest lab upgrade round, I found myself running into an error when upgrading NSX. The NSX Edge Transport Nodes (ETN) upgrade successfully, however, the NSX Host Transport Nodes (HTN) portion fails.
INFO
Not that the solutions is so special but it had me running around a bit, therefore I wanted to share.
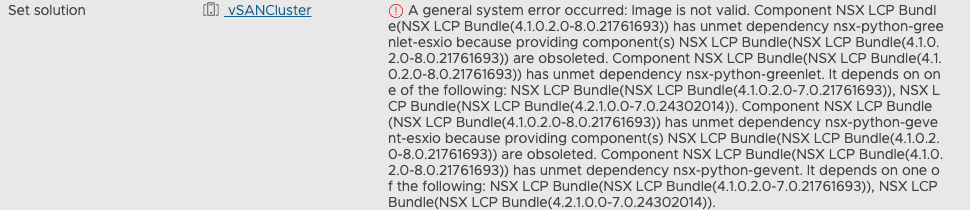
The upgrade returns the following error:
A general system error occurred: Image is not valid. Component NSX LCP Bundle(NSX LCP Bundle(4.1.0.2.0-8.0.21761693)) has unmet dependency nsx-python-greenlet-esxio because providing component(s) NSX LCP Bundle(NSX LCP Bundle(4.1.0.2.0-8.0.21761693)) are obsoleted.
At the same time the same error is listed on vCenter:
Wile not exactly mentioning the solution, it got me thinking it could be similar. The procedure instructs to download, and work with the JSON export of the vLCM configuration:
I removed the highlighted nsx-lcp-bundle line, saved and imported the JSON again to vLCM. Hereafter I retried the upgrade on NSX and could progress now!
Are you tired of constantly typing the password when executing cell-management-tool commands on VCD cells? Here is a quick tip on how to use the cell-management-tool without using credentials.
There is an option -i that allows you to execute commands using the pid (process id) instead of providing the system-administrator credentials.
How does it work?
first you retrieve the pid number
the -i option allows you to use the pid number to bypass the authentication (you were logged on with a user with administrative permissions anyway)
The following will display the activity (-t, or –status) on the VCD cell. If not using the pid method, one would use -u for the username, and then be prompted for the password.
You can find the cell-management-tool command line reference here (VCD 10.4).
Let’s take a look how it would normally work:
retrieve the pid number
cat /var/run/vmware-vcd-cell.pid24663
ShellSession
Now we will use the pid number as a parameter to execute the command:
cd /opt/vmware/vcloud-director/bin./cell-management-tool cell -i 24663 -t
ShellSession
Let’s do some small optimization now. We will combine the two command into a one-liner. This will retrieve the pid at execution time.
cd /opt/vmware/vcloud-director/bin./cell-management-tool cell -i $(cat /var/run/vmware-vcd-cell.pid) -t
ShellSession
Happy to share this quick tip. Now you can also execute the cell-management-tool without using credentials, and maybe be a less frustrated, having to type that password over and over again 😀 !
Do not use the -p option
The -p option allows you to specify your password on the command line. However, this will be shown in plain text, and will be stored in the cli history. Other system administrators might be seeing this history, and therefore also this password.
To be honest, I have been complaining somewhat over the last year, or so, about the NSX Advanced Load Balancer documentation. Mostly that it was not easy to be found, and one was having to fall back on the avinetworks.com site, which was not great either.
On docs.vmware.com the navigation links were not existing. However, if and when you knew the page titles, you could search for them through search engines. That showed that a lot of those documentation pages were there, in fact, but only not visible with non-existing links.
However, since a couple weeks, there is a banner on the avinetworks.com site that 22.1.4 is the latest release that was documented on avinetworks.com.
NSX ALB documentation deprecation on avinetworks.com
This means that the single source of truth will be on the NSX Advanced Load Balancer page on docs.vmware.com (the link does redirect you to that location 😀).
Quick tip: if you want to search within a site through a browser, e.g. chrome, use the following as an example:
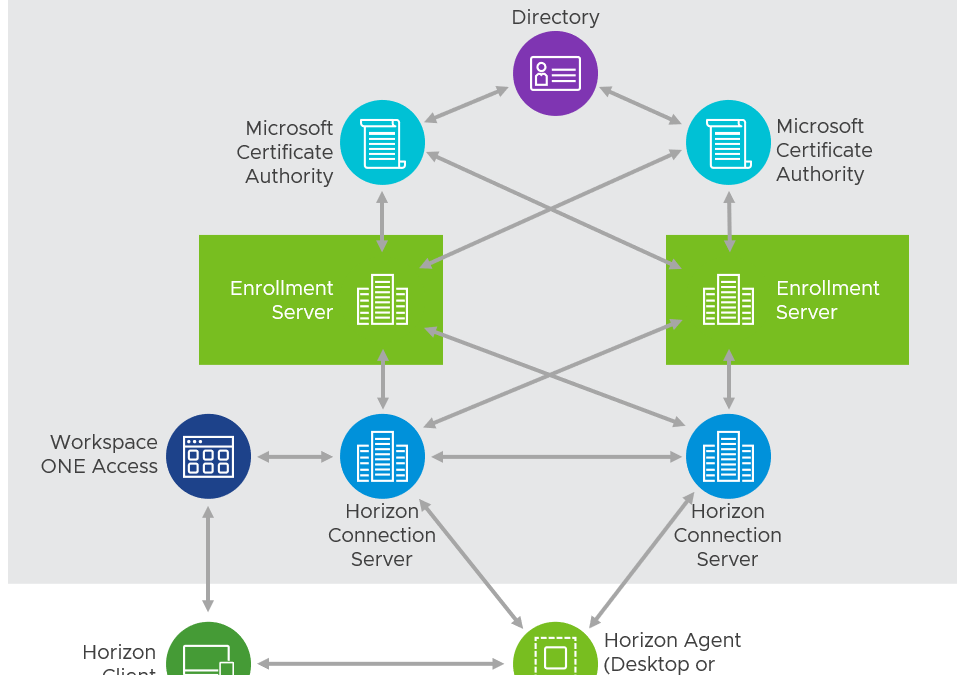
Are you setting up TrueSSO? Are you looking to use signed certificates to secure the communication between the Connection Server and the Enrollment Server?
Try to find the documentation on using signed certificates to secure that communication. I challenge you, you will not find it easily.
What and why?
You are allowing access to the Unified Access Gateway from the internet. You will want those services to have signed certificates to secure the communication, which will turn that icon in the Horizon client green. To enable end-to-end signed communication, you will need to make sure that you have certs all the way. In the end you are creating tunnels to backend services.
On top of that you want to add TrueSSO in the equation as you want a seamless sign-on experience. This means more certificates. You follow the guides (and all the blog posts that are built using this information), so you are almost there.
However, one step is exporting the ‘vdm.ec’ certificate from the Connection Server and import it on the Enrollment Server. That is exactly where the information is missing or at least hard to be found. None of them actually talk about CA signed certificates for this. You are doing this kind of effort to get all those components (Microsoft) CA signed. Don’t you think that you should use signed certificates here as well, if . I think so!
Where can I find the documentation
Here is the documentation on the VMware websites on setting up TrueSSO: