INTRO
Lately, I have been doing quite some work on VMware vSphere with Tanzu. A prerequisite to configure vSphere with Tanzu is a load balancer of some sort. Currently the following are supported, HAProxy, the NSX-T integrated load balancer or the NSX Advanced Load Balancer (ALB). (Support for the NSX ALB was added with the release of vSphere 7 U1.)
The endgoal of the setup is to host several websites in combination with a Horizon environment on a single IP. Because not all systems can handle Let’s Encrypt requests, eg UAG, I want one system that handles the certificate request and does the SSL offloading for the endpoints. So I was looking for a load balancer solution with Let’s Encrypt ability, The NSX Advanced Load Balancer (ALB) adds the ability to request Let’s Encrypt certificates through ControlScripts.
I already learned a lot on the NSX ALB and having some experience with other brands of load balancers certainly helped me to get up to speed quickly.
The goal of this post is to set up a standard Virtual Service (VS) and request a Let’s Encrypt certificate for that VS. You will see that it is quite easy.
Prequisites
I will not configure some necessary configuration settings. They are, however, required to successfully execute the steps below. I will assume the following prerequisites are in place.
The following post shows how to deploy the NSX Advanced Load Balancer and how to configure a ‘VMware vCenter/vSphere ESX’ cloud.
https://www.virtualizationhowto.com/2021/06/avi-load-balancer-vmware-standalone-install/
- The NSX ALB registered with a cloud. I use a ‘VMware vCenter/vSphere ESX’ cloud
- A public DNS entry for the Virtual Service. (Let’s Encrypt needs to be able to check your Virtual Service)
- Some way to get to the virtual service from the internet. I have setup a NAT rule on my firewall for this.
- Server Pool. (Needed to create the Virtual Service. It is obvious that the Virtual Service needs some endpoint to send the requests to.)
- Network config for VIP and SE. (Once you configure a ‘VMware vCenter/vSphere ESX’ cloud, you’ll have access to the networks known to vCenter. You will need to configure ‘Subnets’ and ‘IP Address Pools’ for the NSX ALB to use for the VSs.)
- IPAM/DNS Profile. (You need to add the Domain Names for the Virtual Services here.)
I will cover these in a later post but for now I added them as a prerequisite.
What does the ControlScript do?
The ControlScript generates a challenge token for the Let’s Encrypt servers to check the service. Secondly, it searches for a Virtual Service with an fqdn with the Common Name supplied on the certificate request. Once it finds that Virtual Service, it checks if it is listening on port 80. If not, it configures the Virtual Service to handle the request on port 80. Then it adds the challenge token to the Virtual Service. Finally, after a succesful certificate request the changes are cleared.
Download the ControlScript
Download the controlscript here (either copy the contents or download the file): https://github.com/avinetworks/devops/blob/master/cert_mgmt/letsencrypt_mgmt_profile.py
Add the Let’s Encrypt ControlScript to the NSX Advanced Load Balancer
Navigate to Templates > Scripts > ControlScripts and click CREATE

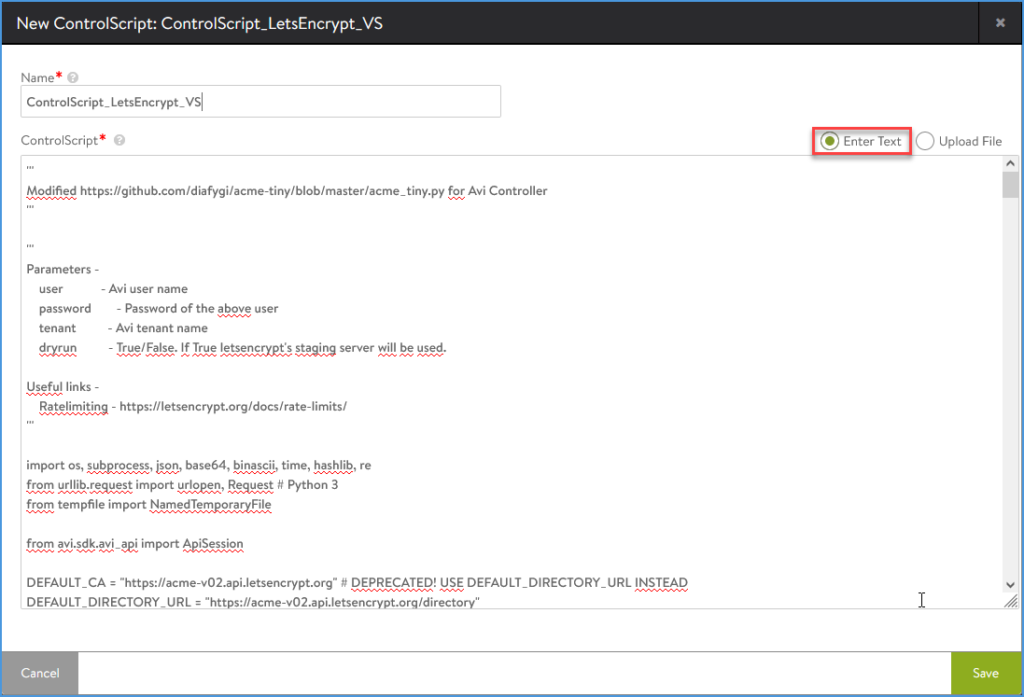
Supply the script name, eg ControlScript_LetsEncrypt_VS, and choose either ‘Enter Text’ or ‘Upload File’. Now we will choose the ‘Enter Text’ option and paste the contents of the python script on github.

Create a Certificate Management profile
Navigate to Templates > Security > Certificate Mangement and click CREATE

Enter the Name ‘CertMgmt_LetsEncrypt_VS’ and select the Control Script ‘ControlScript_LetsEncrypt_VS’

Click ‘Enable Custom Parameters’ and add the following:
| Name | Value | Comment |
|---|---|---|
| user | admin | |
| password | <enter your NSX ALB controller password for the admin user> | toggle: Sensitive |
| tenant | admin | important: otherwise the script won’t have clue on which tenant it should be applied |
Add the Custom Parameter ‘tenant’ even if you only have one tenant, the default tenant (admin). I have struggled a lot with the script failing without having a clue why that was. Ultimately, after a long search and monitoring the log through tail, there was something in the logs that pointed me in this direction.

There is a possibility to add a fourth parameter ‘dryrun’, with value true or false. This will toggle the script to use the Let’s Encrypt staging server.
Create the Virtual Service
Navigate to Applications > Virtual Services > CREATE VIRTUAL SERVICE and click ‘Advanced Setup’

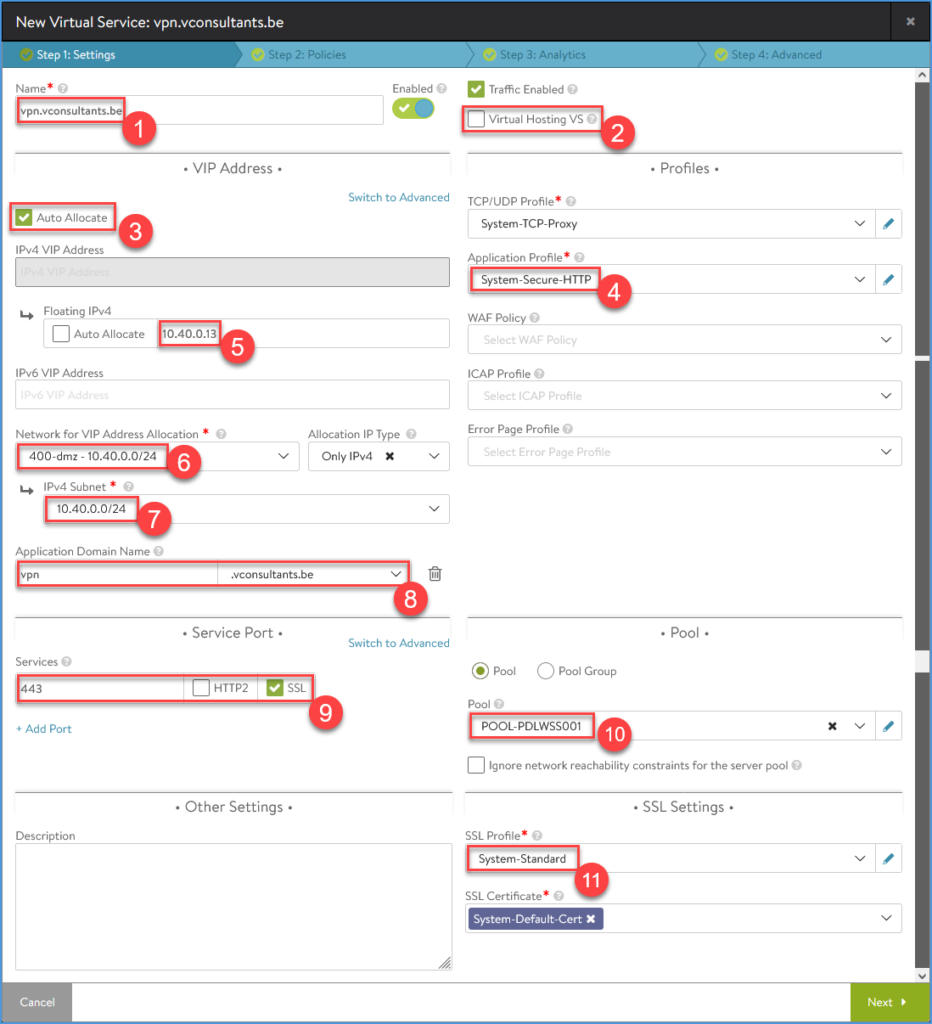
Create the VS with the SNI, in this example I will create ‘vpn.vconsultants.be’. Configure the settings page and leave the other tabs with the default settings.
- Supply the VS name (I use the fqdn/SNI just for manageability)
- Leave the checkbox ‘Virtual Hosting VS’ unchecked (default). (We will setup a standard VS.)
- Leave the checkbox ‘Auto Allocate’ checked (default). (It takes an IP from the Network pool.)
- Change the ‘Application Profile’ to ‘System-Secure-HTTP’.
- Supply a ‘Floating IPv4’. (I use a static one so that I’m able to setup NAT to this IP on my firewall.)
- Select a ‘Network for VIP Address Allocation’. (The SE will create the VIP in this network.)
- Select a ‘IPv4 Subnet’. (Only the ones created in the Network config for VIP and SE will be available.)
- Change the ‘Application Domain Name’ so that it matches the fqdn of the SNI. (This will fill automatically based on the VS Name.)
- Check SSL and verify that the port changes to 443
- Select the correct Pool
- Change the ‘SSL Profile’ to ‘System-Standard’

Request a Let’s Encrypt certificate for the NSX ALB Virtual Service
Navigate to Templates > Security > SSL/TLS Certificates > CREATE and click Application Certificate

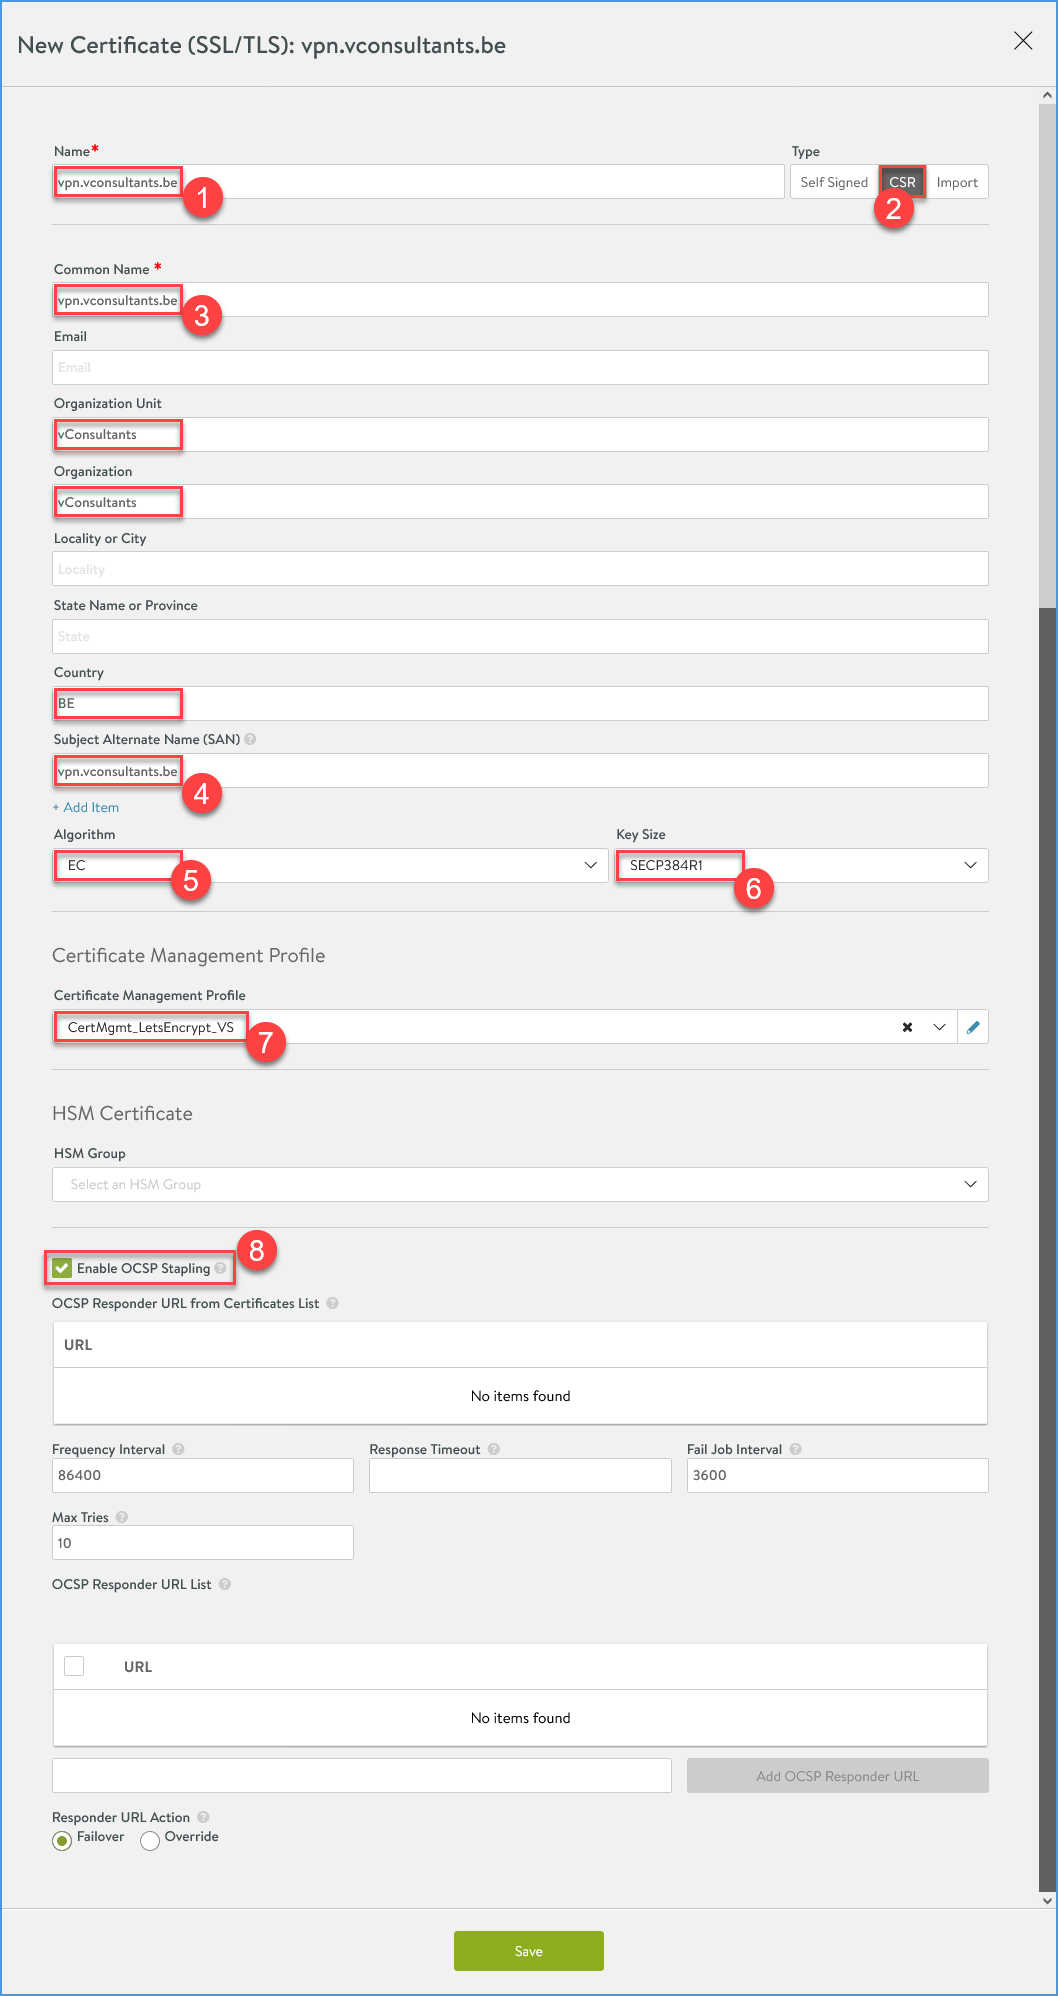
Fill in the details for the Certificate Request (CSR) with the SNI for the certificate you want to request. The script will run when the SAVE button is clicked.
- Supply the Certificate name (I use the fqdn/SNI just for manageability)
- Select ‘Type’ ‘CSR’.
- Supply the certificate ‘Common Name’. This is where you supply the actual name of the certificate you want to request, in this case vpn.vconsultants.be.
- Supply the certificate ‘Common Name’ as ‘Subject Alternative Name’.
- I started to use ‘EC’ as the certificate ‘Algorithm’ over ‘RSA’
- Select a ‘Key Size’. Be aware that when choosing ‘EC’ as ‘Algorithm’, ‘SECP384R1’ is the latest that Let’s Encrypt supports for now.
- Select ‘Certificate Management Profile’ ‘CertMgmt_LetsEncrypt_VS’.
- Check ‘Enable OCSP Stapling’, this will speed up the certificate validation process.

Now watch the magic.

Add the Let’s Encrypt certificate to the NSX ALB Virtual Service
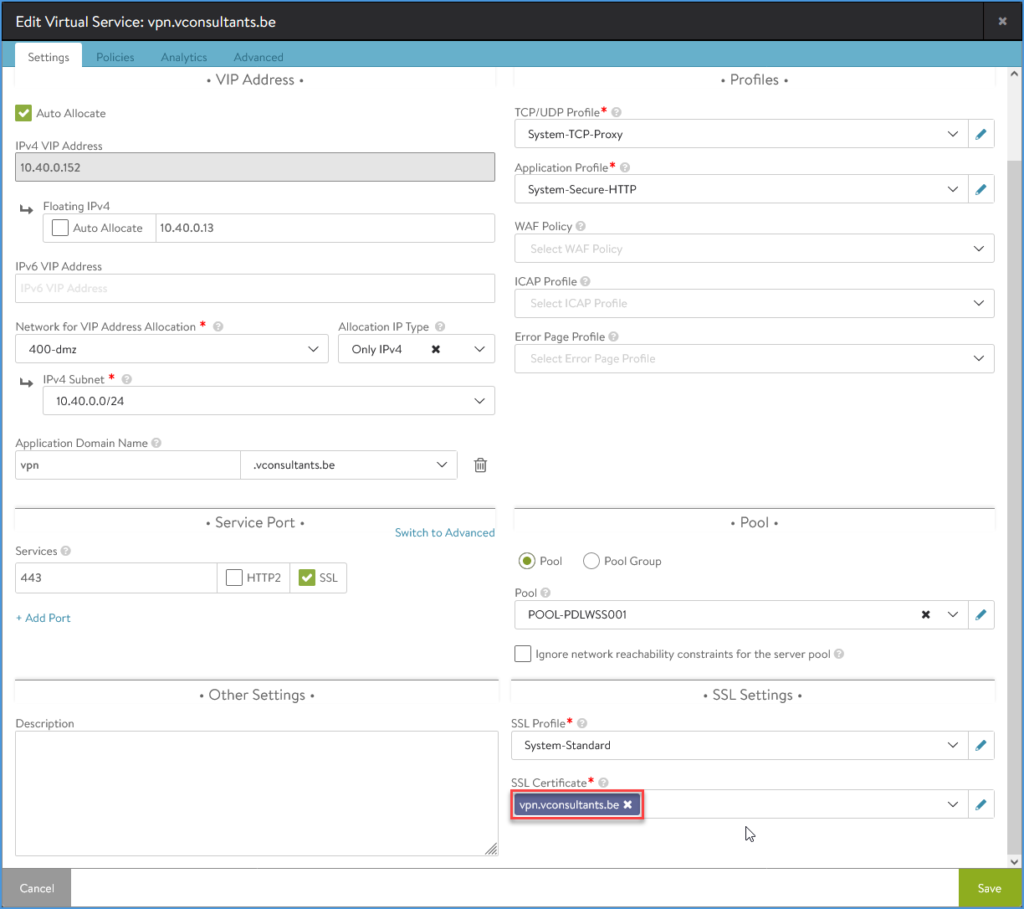
A final step to do in this setup is to apply the certificate on the VS.

In the end, you will have an NSX Advanced Load Balancer (ALB) Virtual Service configured with a Let’s Encrypt certificate.
Next POST
In the next post I’ll show the customized script that enables Let’s Encrypt Certificate Management for Enhanced Virtual Hosting (EVH) where the certificate will be requested for a EVH child Virtual Service.