A client of mine was looking on how to update the maximum failed OS login attempts because they were having an issue with the monitoring solution locking the root user account on the VMware Unified Access Gateway 2212. This version of the UAG is based on photon OS 3.0.
He asked me to verify where to change the configuration to update the maximum failed OS login attempts. This is normally set at UAG deploy time and there is no option to change it afterwards easily.
Be aware that this is a rather unconventional change because these values shouldn’t be changed from the default, especially if you want to be compliant with CIS audits for example.
This is the default and also the line that you need to change
Change the deny=3 to the maximum value you want. If you change it to 0 (zero) it will never deny based on the maximum failed OS login attempts for all local users
even_deny_root
Leave it out if it shouldn’t deny the root user being locked out on the maximum failed OS login
Deleting the datastore where a content library is hosted is probably not the best idea but … yes stupid error and now what. If you are not faint of heart (and now how to take a snapshot), you can rectify this. You should contact GSS as there is not documented solution and this might break.
Take a snapshot and verify if the vCenter backups are in a healthy status. Yes? Ok go ahead.
Log on to the vCenter and create a new Content Library and name it ‘i-made-an-error’. Use the new datastore you want to use and keep the rest of the settings default as these don’t really matter.
Open an SSH session to the vCenter and connect to the Postgress DB ‘VCDB’
psql -d VCDB -U postgres
ShellSession
To show which tables are present within the database:
\d
SQL
Show an overview of the Content Libraries added ( make sure to add the trailing ;):
SELECT id,nameFROM cl_library;
SQL
Now that we have an overview of the Content Libraries, with the one that is throwing an error highlighted.
Find the content library id
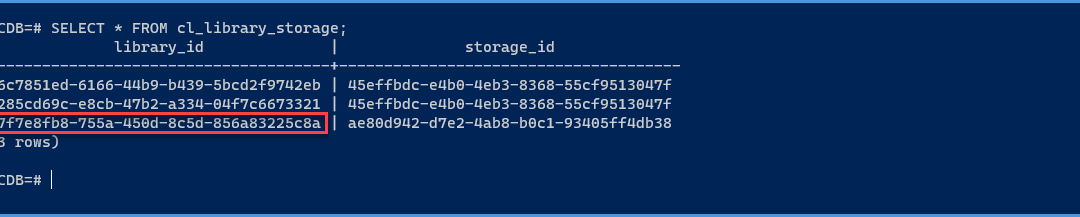
In the following overview we find the library id from the new Content Library we just added and also the corresponding storage id.
SELECT*FROM cl_library_storage;
SQL
Find the content library storage id
I will update the storage id from the faulty one we found on the previous screenshot with the one we found for the new Content Library.
Some time ago we were having issues in the Tanzu PoC class for partners we were teaching. One of the students had an environment where the Enable Workload Management process was unable to finish the creation of the Supervisor Cluster.
It was an interesting issue because when we verified all the settings we saw everything configured correctly on a UI level. Nevertheless when went to the virtualservice we saw that it was down because of the servers in the pool were not up.
When the Enable Workload Management is unable to finish, there are some usual suspects. Most of the time the details within the Enable Workload Management wizard are just not correct. Validation on the values supplied could be better I believe. You only know when it takes to long, that you need to start verifying the components. The following milestones can be checked.
Are the Supervisor Control Plane VMs created?
Do the Supervisor Control Plane VMs have the correct amount of IPs
Are the NSX ALB Service Engine VMs created?
During the troubleshooting, we verified these usual suspects. We also verified all values supplied in the different consoles, being the Workload Management configuration page in the vSphere client but also on the NSX ALB. It seemed that this student had done everything correct. We started to exclude issues with pinging, executing curl to the relevant ip’s and checking the logs.
At a moment we arrived at the Service Engines and went from there. At lunch time I stumbled onto this blog post from Nick Schmidt (a fellow vExpert), which made a jump in to the troubleshooting phase:
This showed how to connect to the networking namespace on the Service Engine and this helped a lot.
If you do not connect to the networking namespace, you will see the configuration on an OS level. Within the networking namespace you troubleshoot within the correct context.
Although the web UI shows the correct values for the configured routes, they were not applied correct on the NSX ALB SE.
Here are the steps that I executed when connected to one of the NSX ALB Service Engines:
Show the network configuration of the NSX ALB SE
ifconfig
ShellSession
Show known routes (only the management route was shown)
ip route
ShellSession
Show the network namespaces (only one was shown in this environment, namely avi_ns1, there was also only one tenant)
ip netns show
ShellSession
Launch a shell within the avi_ns1 namespace (to be able to work within that context)
ip netns exec avi_ns1 bash
ShellSession
Show routes known within the avi_ns1 namespace
ip route
ShellSession
Now we saw that there was a route missing within this namespace. We went back to the web UI deleted the route and re-created, et voila the servers in the pool came up and therefor the virtualservice was alive.
I recently experienced an issue within a HPE environment where vSphere Lifecycle Management (vLCM) fails to upgrade the firmware on a HP FlexFabric 534FLR-SFP+ Adapter.
On HPE Gen10 servers it is possible to leverage vSphere LifeCycle Management to manage not only the ESXi version but also the firmware and drivers of the different hardware components. vLCM leverages a vendor tool, in HPE’s case it is either HP OneView or HP Amplifier, to do the lift and shift for the firmware.
Apparently it fails when there are multiple adapters present in the system which have a firmware v7.15.97 or prior. The upgrade would succeed on one adapter but not on the subsequent adapter(s), see here. The KB is specifically mentioning HP OneView but as I experienced it is also affecting HP Amplifier, which makes sense.
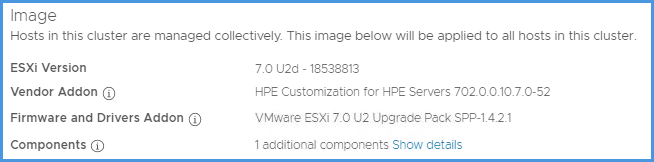
The following screenshot shows two hosts out of compliance with the image, because of that specific firmware. Other hosts in that cluster upgraded the firmware on the adapter just fine. It really is due to the version to upgrade from.
Resolution
The article is providing a link to a firmware upgrade utility, which is for ESXi 6.0 / 6.5. You can download the 7.0 version here.
Now that we downloaded the firmware update utility, put the host into Maintenance Mode and copy it onto the ESXi host. Putting it in the /tmp directory gives the (dis)advantage that is tis removed when the machine is rebooted.
scp CP049023.zip root@host_fqdn:/tmp
ShellSession
SSH to the host and install the firmware update utility (Smart Component):
Now go to the directory where the firmware update utility is installed and run it:
cd /opt/Smart_Component/CP049023./Execute_Component
ShellSession
This should be the output:
Command [ ./Execute_Component ]Number of parameters passed in [ 0 ]The parameters are [ ]OS Version found [7.0.2]Process [7.0.2] with path [./ESXi_7.0]Set Flash Engine files for path [./ESXi_7.0]... leaving ./determine_which_OS.sh in /opt/Smart_Component/CP049023 ...execute hpsetup with parameters [ ]===============================================================HPE QLogic NX2 Online Firmware Upgrade Utility for VMwareVersion: 1.28.50Performing Discovery operation......Please be patient..Selecting HP FlexFabric 10Gb 2-port 534FLR-SFP+ Adapter MAC: 1458D041DB10Update MBI 7.10.72 to 7.18.80 y/n/q (y):yFirmware update in progress......It will take a while....Please be patient..Please reboot for the firmware flash to complete.... END [ ./Execute_Component - Return value is 1 ] ...
ShellSession
If the Return value is 1, that is a good sign. I had to rerun it some times because of return value 0. I also had a return value of 106, which didn’t change after several runs. I rebooted that host, ran it again and then it went ok.
As a final step clean up the actions, so remove the firmware update utility:
Lately, I have been doing quite some work on VMware vSphere with Tanzu. A prerequisite to configure vSphere with Tanzu is a load balancer of some sort. Currently the following are supported, HAProxy, the NSX-T integrated load balancer or the NSX Advanced Load Balancer (ALB). (Support for the NSX ALB was added with the release of vSphere 7 U1.)
The endgoal of the setup is to host several websites in combination with a Horizon environment on a single IP. Because not all systems can handle Let’s Encrypt requests, eg UAG, I want one system that handles the certificate request and does the SSL offloading for the endpoints. So I was looking for a load balancer solution with Let’s Encrypt ability, The NSX Advanced Load Balancer (ALB) adds the ability to request Let’s Encrypt certificates through ControlScripts.
I already learned a lot on the NSX ALB and having some experience with other brands of load balancers certainly helped me to get up to speed quickly.
The goal of this post is to set up a standard Virtual Service (VS) and request a Let’s Encrypt certificate for that VS. You will see that it is quite easy.
Prequisites
I will not configure some necessary configuration settings. They are, however, required to successfully execute the steps below. I will assume the following prerequisites are in place.
The following post shows how to deploy the NSX Advanced Load Balancer and how to configure a ‘VMware vCenter/vSphere ESX’ cloud.
The NSX ALB registered with a cloud. I use a ‘VMware vCenter/vSphere ESX’ cloud
A public DNS entry for the Virtual Service. (Let’s Encrypt needs to be able to check your Virtual Service)
Some way to get to the virtual service from the internet. I have setup a NAT rule on my firewall for this.
Server Pool. (Needed to create the Virtual Service. It is obvious that the Virtual Service needs some endpoint to send the requests to.)
Network config for VIP and SE. (Once you configure a ‘VMware vCenter/vSphere ESX’ cloud, you’ll have access to the networks known to vCenter. You will need to configure ‘Subnets’ and ‘IP Address Pools’ for the NSX ALB to use for the VSs.)
IPAM/DNS Profile. (You need to add the Domain Names for the Virtual Services here.)
I will cover these in a later post but for now I added them as a prerequisite.
What does the ControlScript do?
The ControlScript generates a challenge token for the Let’s Encrypt servers to check the service. Secondly, it searches for a Virtual Service with an fqdn with the Common Name supplied on the certificate request. Once it finds that Virtual Service, it checks if it is listening on port 80. If not, it configures the Virtual Service to handle the request on port 80. Then it adds the challenge token to the Virtual Service. Finally, after a succesful certificate request the changes are cleared.
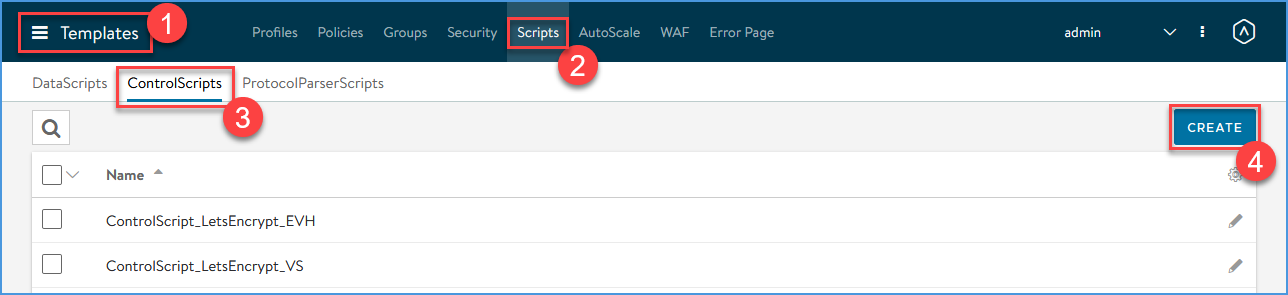
Add the Let’s Encrypt ControlScript to the NSX Advanced Load Balancer
Navigate to Templates > Scripts > ControlScripts and click CREATE
Create a new ControlScript
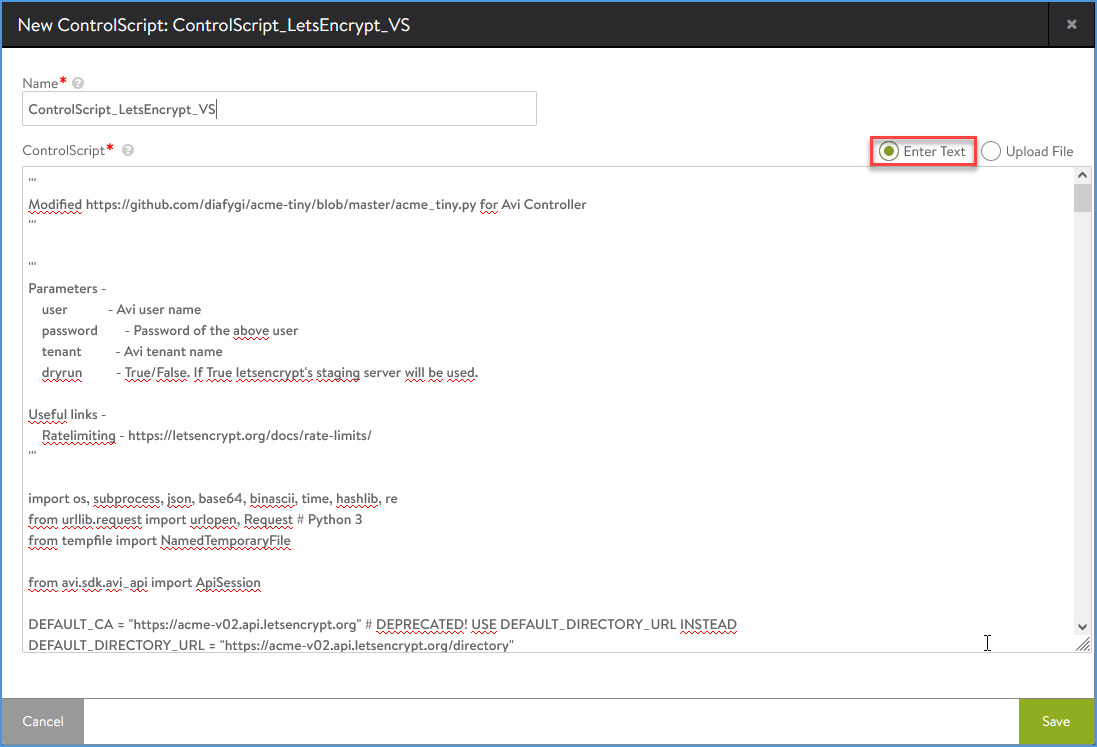
Supply the script name, eg ControlScript_LetsEncrypt_VS, and choose either ‘Enter Text’ or ‘Upload File’. Now we will choose the ‘Enter Text’ option and paste the contents of the python script on github.
Add the ContolScript logic as text
Create a Certificate Management profile
Navigate to Templates > Security > Certificate Mangement and click CREATE
Create a Certificate Management profile
Enter the Name ‘CertMgmt_LetsEncrypt_VS’ and select the Control Script ‘ControlScript_LetsEncrypt_VS’
Enter the Certificate Management profile details
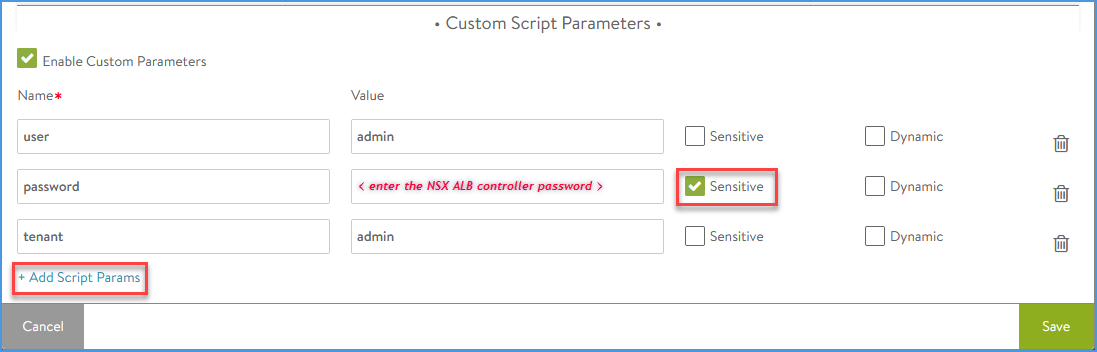
Click ‘Enable Custom Parameters’ and add the following:
Name
Value
Comment
user
admin
password
<enter your NSX ALB controller password for the admin user>
toggle: Sensitive
tenant
admin
important: otherwise the script won’t have clue on which tenant it should be applied
Overview custom parameters
Add the Custom Parameter ‘tenant’ even if you only have one tenant, the default tenant (admin). I have struggled a lot with the script failing without having a clue why that was. Ultimately, after a long search and monitoring the log through tail, there was something in the logs that pointed me in this direction.
Adding custom parameters
There is a possibility to add a fourth parameter ‘dryrun’, with value true or false. This will toggle the script to use the Let’s Encrypt staging server.
Create the Virtual Service
Navigate to Applications > Virtual Services > CREATE VIRTUAL SERVICE and click ‘Advanced Setup’
Create a new Virtual Service
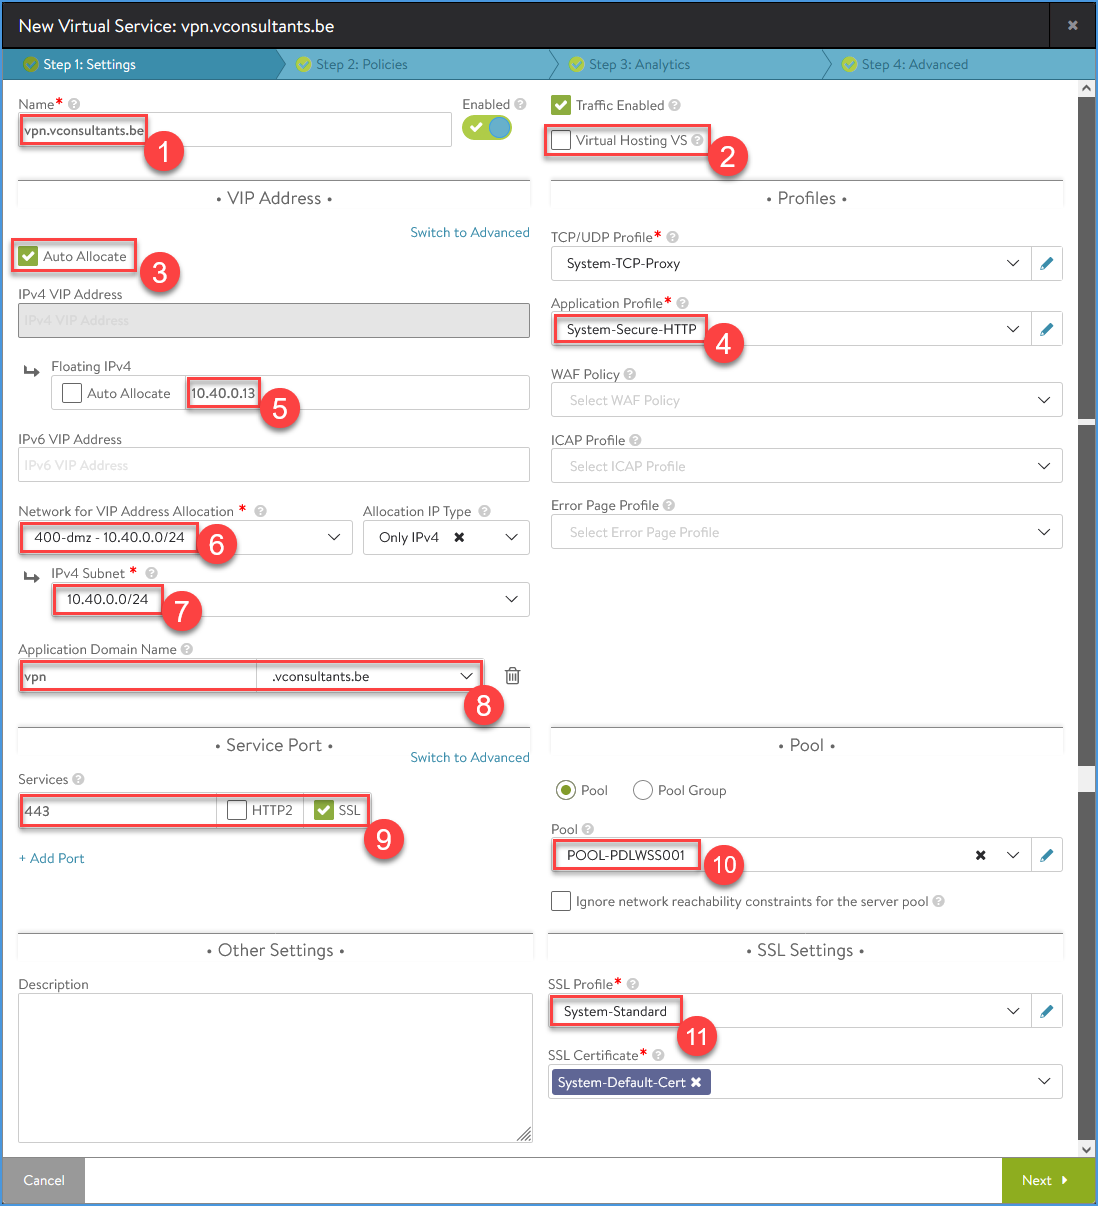
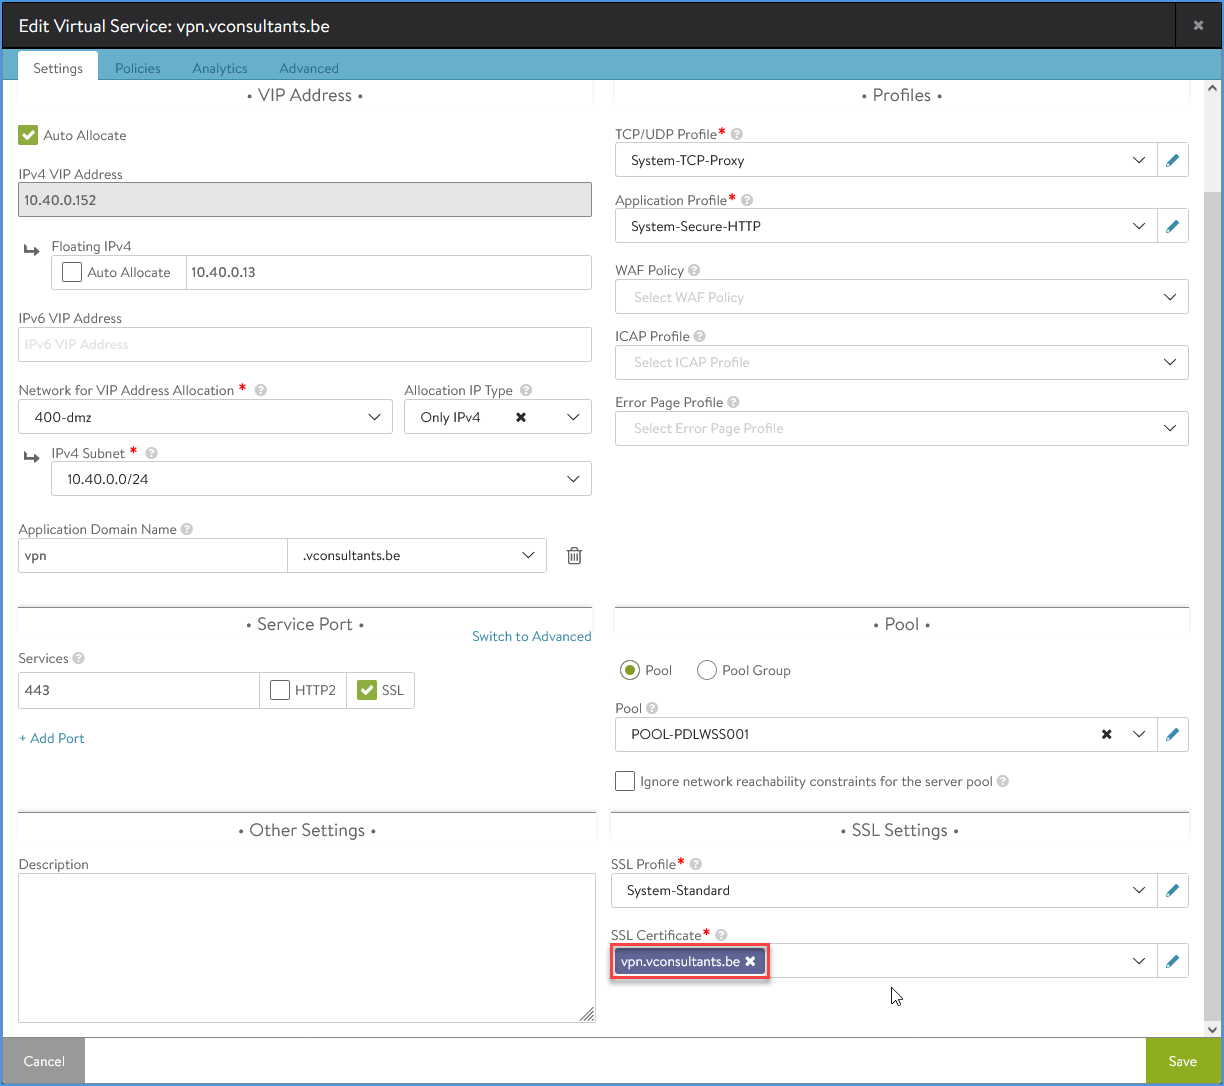
Create the VS with the SNI, in this example I will create ‘vpn.vconsultants.be’. Configure the settings page and leave the other tabs with the default settings.
Supply the VS name (I use the fqdn/SNI just for manageability)
Leave the checkbox ‘Virtual Hosting VS’ unchecked (default). (We will setup a standard VS.)
Leave the checkbox ‘Auto Allocate’ checked (default). (It takes an IP from the Network pool.)
Change the ‘Application Profile’ to ‘System-Secure-HTTP’.
Supply a ‘Floating IPv4’. (I use a static one so that I’m able to setup NAT to this IP on my firewall.)
Select a ‘Network for VIP Address Allocation’. (The SE will create the VIP in this network.)
Select a ‘IPv4 Subnet’. (Only the ones created in the Network config for VIP and SE will be available.)
Change the ‘Application Domain Name’ so that it matches the fqdn of the SNI. (This will fill automatically based on the VS Name.)
Check SSL and verify that the port changes to 443
Select the correct Pool
Change the ‘SSL Profile’ to ‘System-Standard’
Enter the Virtual Service details
Note: Item 7 is a bit awkward. Hovering over the question mark for help, it states that it is only applicable if the VirtualService belongs to an OpenStack or AWS cloud. When you don’t set this option, you cannot go forward. This confuses me somewhat, as I only use a vSphere cloud.
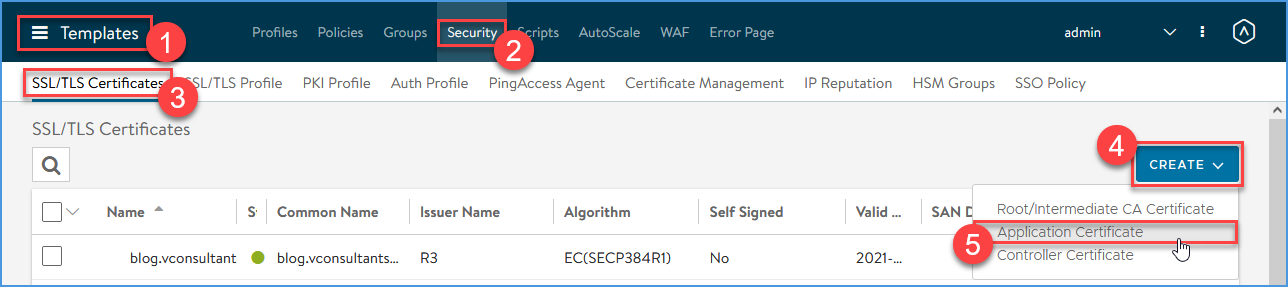
Request a Let’s Encrypt certificate for the NSX ALB Virtual Service
Navigate to Templates > Security > SSL/TLS Certificates > CREATE and click Application Certificate
Request a Let’s Encrypt certificate for the Virtual Service
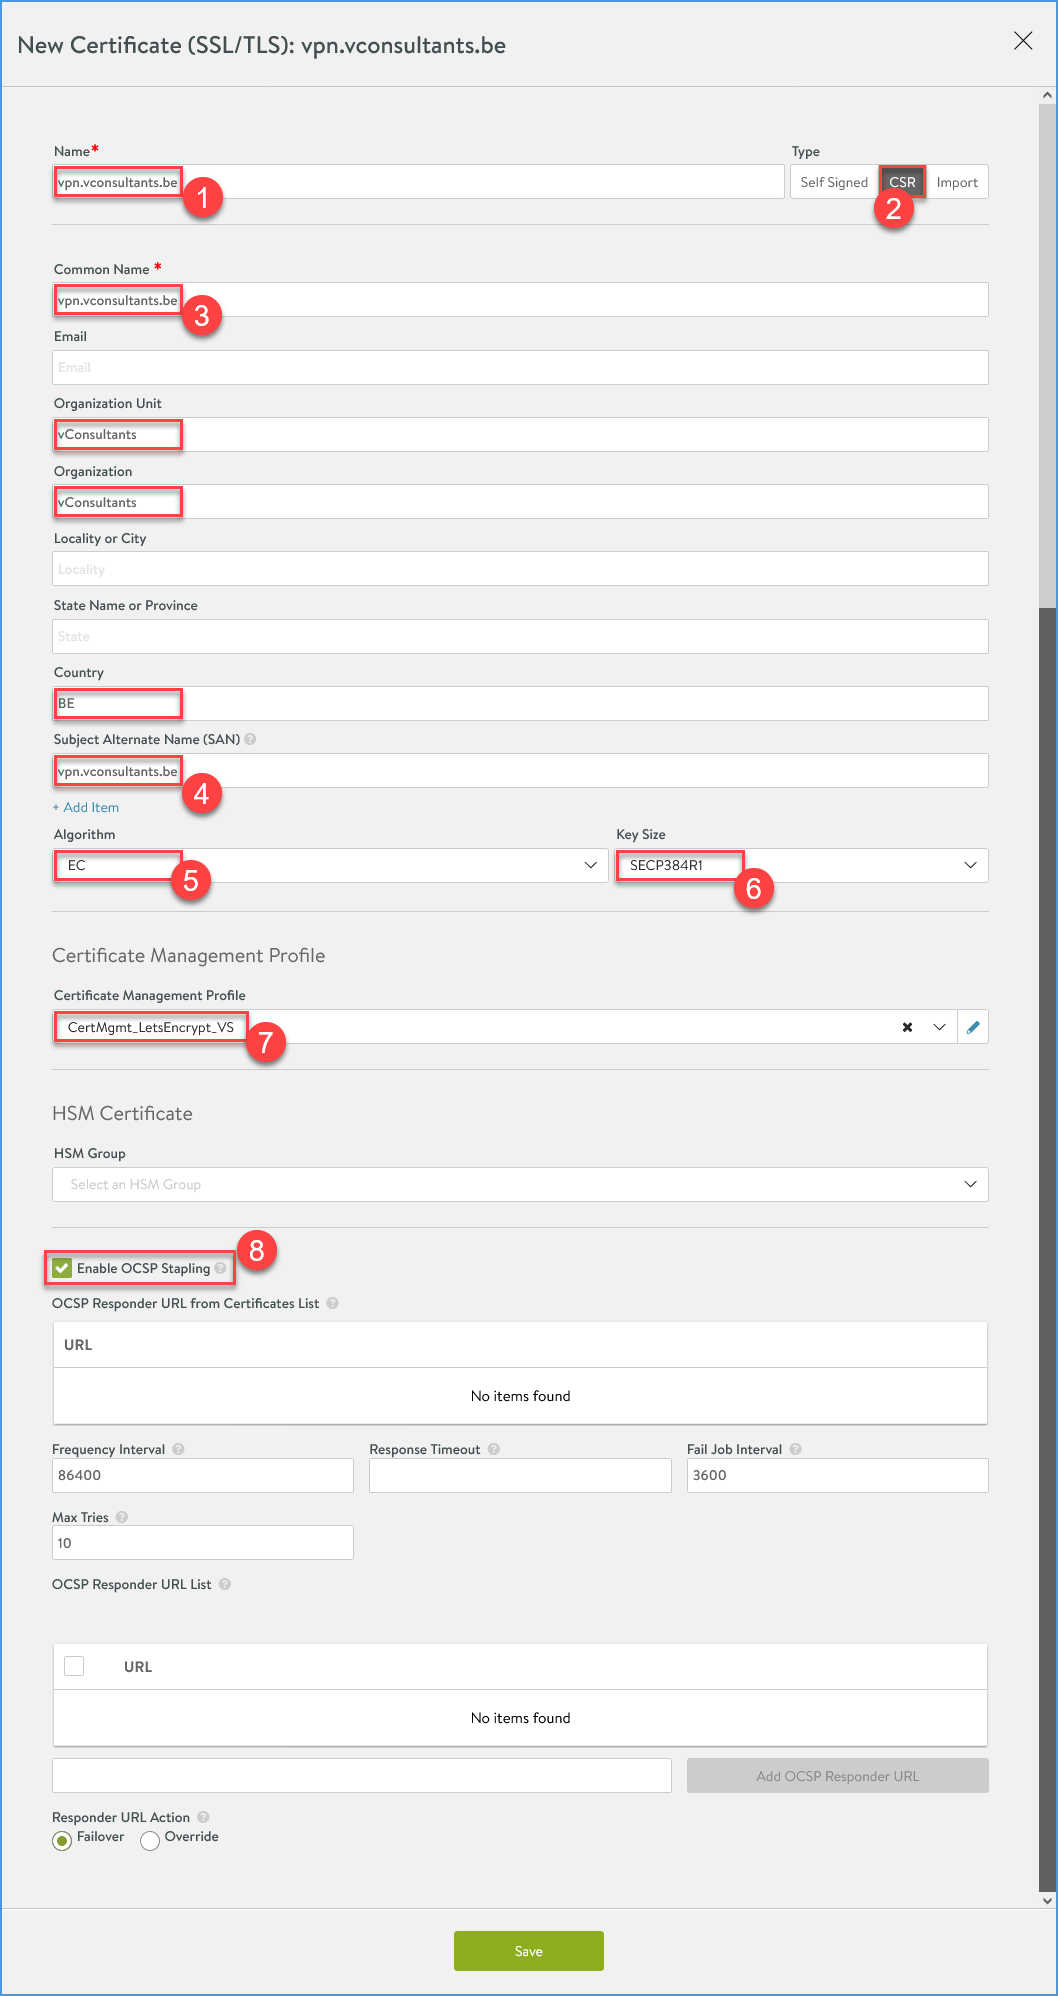
Fill in the details for the Certificate Request (CSR) with the SNI for the certificate you want to request. The script will run when the SAVE button is clicked.
Supply the Certificate name (I use the fqdn/SNI just for manageability)
Select ‘Type’ ‘CSR’.
Supply the certificate ‘Common Name’. This is where you supply the actual name of the certificate you want to request, in this case vpn.vconsultants.be.
Supply the certificate ‘Common Name’ as ‘Subject Alternative Name’.
I started to use ‘EC’ as the certificate ‘Algorithm’ over ‘RSA’
Select a ‘Key Size’. Be aware that when choosing ‘EC’ as ‘Algorithm’, ‘SECP384R1’ is the latest that Let’s Encrypt supports for now.
Check ‘Enable OCSP Stapling’, this will speed up the certificate validation process.
Enter certificate request details
Now watch the magic.
Certificate requested and valid
Note:I added the Root and Intermediates certificates to the NSX ALB controller to validate the certificate. That is why the color of the circle is green.
Add the Let’s Encrypt certificate to the NSX ALB Virtual Service
A final step to do in this setup is to apply the certificate on the VS.
Assign requested certificate to Virtual Service
In the end, you will have an NSX Advanced Load Balancer (ALB) Virtual Service configured with a Let’s Encrypt certificate.
Next POST
In the next post I’ll show the customized script that enables Let’s Encrypt Certificate Management for Enhanced Virtual Hosting (EVH) where the certificate will be requested for a EVH child Virtual Service.